Writing a ray tracer for the web
In 2019, Khronos announced and introduced WebGL 2.0 Compute, a new specification allowing to use the GPU for more than rasterisation.
What it really means is that we will be able to use compute shaders. These shaders allow to do many more things than the classical vertex, fragment and geometry shader pipeline used for realtime 3D applicaitons.
WebGL 2.0 Compute is still a draft, but some browsers already have implemented it. For example, you can use this API on chrome if you enable some flags:
chrome --use-cmd-decoder=passthrough --use-angle=gl --enable-webgl2-compute-context
I really wanted to test this new API. So I decided to write a very simple ray tracer. The goal wasn’t to make something pretty or production-ready, but to play with compute shaders and see what can be achieved in a web browser.
The complete project can be found on github.
There is another API called Web GPU that can be used for the same thing. I will do the same project with this new API and let you know how things go. If you don’t want to miss it, follow me on twitter @oktomus !
Random numbers
One of the most important thing needed for a raytracer is a good Random Number Generator (RNG).
We need a way to generate pseudo-random numbers that is fast, must not have noticeable patterns and behave correctly over time.
The one I use is directly copied from somewhere on internet and is seed-based.
I created a simple demo showing the RNG result, so that you can easily understand how to use the WebGL 2.0 Compute API: demo / code. Here is the shader:
#version 310 es

layout (local_size_x = 16, local_size_y = 16, local_size_z = 1) in;

layout (rgba8, binding = 0) writeonly uniform highp image2D outputTex;

uniform float uSeed;

float rand(inout float seed, vec2 pixel)
{
    float result = fract(sin(seed / 100.0f * dot(pixel, vec2(12.9898f, 78.233f))) * 43758.5453f);
    seed += 1.0f;
    return result;
}

void main() {
    ivec2 storePos = ivec2(gl_GlobalInvocationID.xy);
    ivec2 imageSize = ivec2(gl_NumWorkGroups.xy * gl_WorkGroupSize.xy);
    vec2 uv = vec2(storePos) / vec2(imageSize);

    float seed = uSeed;

    float n = rand(seed, uv);
    vec4 color = vec4(n, n, n, 1.0);

    imageStore(outputTex, storePos, color);
}
This RNG could be much better. Because the seed is sequential, we can notice some repetitions and patterns. Using a hash of the seed could give better results.
There is a really nice shadertoy tool to compare different RNGs that you can find here.
Intersections
Testing for intersection between a ray and a shape is one of the first thing that you implement when making a ray tracer.
Compared to CPU, implementing intersection on GPU is pretty much the same. However, it is much more complicated to debug GPU code since you can’t attach a debugger or print things.
Also, don’t expect your GPU code to fail and throw an error as it does on the CPU. You won’t get runtime shader execution errors printed out like Array index out of bounds or such.
Here is the code I used to test intersection with triangles:
struct Ray {
    vec3 origin;
    vec3 direction;
};

vec3 ray_at(Ray r, float t)
{
    return r.origin + r.direction * t;
}

// Test intersection between a ray and a triangle using Möller–Trumbore algorithm.
bool hit_triangle_mt(Ray r, vec3 v0, vec3 v1, vec3 v2, out float t)
{
    vec3 e1 = v1 - v0;
    vec3 e2 = v2 - v0;
    vec3 h = cross(r.direction, e2);

    float a = dot(e1, h);

    if (a < EPSILON && a > EPSILON)
        return false;

    float f = 1.0 / a;
    vec3 s = r.origin - v0;

    float u = f * dot(s, h);

    if (u < 0.0 || u > 1.0)
        return false;

    vec3 q = cross(s, e1);
    float v = f * dot(r.direction, q);

    if (v < 0.0 || u + v > 1.0)
        return false;

    t = f * dot(e2, q);

    if (t > EPSILON)
    {
        return true;
    }

    return false;
}
Note that there is a lot of operations that are already implemented on the GPU like cross and dot.
Shading
As with intersection, shading is also similar on GPU and CPU. Just know that:
- dynamic allocation isn’t allowed and
- recursive functions are not a thing.
Regarding dynamic allocation, it’s not really a problem because you should already be doing the same on CPU if you want your ray tracer to be fast.
For the recursive part, it’s a bit annoying at the begining and it can make coding a bit more difficult. But in the end, you can achieve the same thing using a good old while loop with some adjustements in your code.
To compute the color of a pixel given a camera ray, I use the following code:
// Compute the color for a given ray.
vec3 color(Ray r, inout float seed, vec2 pixel)
{
    // Some variables used in the while loop.
    float t;
    vec3 n;
    int mesh_index;

    vec3 res = vec3(0.0);

    // I hard-coded the light in the code, but we could easily
    // make them dynamic.
    int light_mesh_index = 0;
    Mesh light = meshes[light_mesh_index];
    int light_count = light.triangle_count;

    int depth = 0;

    while (depth < 5
        && hit_world(r, EPSILON, MAX_FLOAT, t, mesh_index, n)
        && t > 0.0)
    {
        Mesh mesh = meshes[mesh_index];
        vec3 surface_normal = n;

        // Primary ray hit a light, stop (for simplicity sake).
        if (mesh.emission != vec3(0.0) && depth == 0)
        {
            return mesh.emission;
        }

        vec3 hit_point = ray_at(r, t);

        // Consider hit.
        if (mesh.emission == vec3(0.0))
        {
            float light_pdf = 0.0;

            // Generate a point on the light.
            vec3 light_point = random_point_on_mesh(light, seed, pixel, light_pdf);

            vec3 lh = light_point - hit_point;
            float dist = length(lh);

            // Trace a shadow ray.
            Ray shadow_ray;
            shadow_ray.origin = hit_point;
            shadow_ray.direction = normalize(lh);

            if (!hit_world(shadow_ray, EPSILON, dist, t, mesh_index, n)
                || mesh_index == light_mesh_index)
            {
                // Direct lighting contribution.
                res += light_pdf * mesh.diffuse * light.emission * abs(dot(surface_normal, shadow_ray.direction));
            }
        }

        // Bounce.
        vec2 s = rand2(seed, pixel);
        vec3 target = hit_point + n + sample_sphere_uniform(s);
        r.origin = hit_point;
        r.direction = normalize(target - r.origin);

        depth++;
    }

    return res / float(depth);
}
The hit_world method tests the intersection between all triangles and the current ray. To drastically improve performances, and avoid useless triangle-ray tests, we could use an acceleration structure like a BVH.
bool hit_world(Ray r, float t_min, float t_max, inout float t, inout int mesh_index, inout vec3 n)
{
    bool does_hit = false;
    t = 0.0;
    float best_min_t = t_max;

    mesh_index = -1;

    // Find the closes triangles that the given ray hit.
    for (int i = 0; i < meshes.length(); ++i)
    {
        Mesh mesh = meshes[i];

        for (int j = 0; j < mesh.triangle_count * 3; j += 3)
        {
            vec3 v0 = vertices[triangles[mesh.offset + j]];
            vec3 v1 = vertices[triangles[mesh.offset + j + 1]];
            vec3 v2 = vertices[triangles[mesh.offset + j + 2]];

            if (hit_triangle_mt(r, v0, v1, v2, t) && t >= t_min && t < t_max && t < best_min_t)
            {
                best_min_t = t;
                does_hit = true;
                mesh_index = i;

                // Compute the normal on the fly.
                n = normalize(cross(v1 - v0, v2 - v0));
            }
        }
    }

    if (does_hit)
    {
        t = best_min_t;
    }

    return does_hit;
}
Acessing to the data on the GPU
Using triangles and materials on the GPU was certainly the most tricky part of this project.
On CPU, we can almost do whatever we want with the memory. It is very easy to create a custom data type, make some lists and start using them to render. Even when writing multi-threaded applications.
But on GPU, it can be really irritating. The reason is that you need to send your data to the GPU before running the renderer. Which makes sense. But you can’t send custom data types, you can only send bytes (at least with WebGL).
So basically, you will have to write the CPU code to correctly pack your scene (triangles, materials, lights) into a buffer, send this buffer (or more), but also write the GPU code for your custom data types and declare the buffers to use them. On top of that, there is some rules to follow for packing your data like padding (you can’t just use the binary equivalent of your data on CPU).
In this project, I used a simple data type to represent each mesh in the scene:
// GLSL
struct Mesh
{
    int offset;
    int triangle_count;
    vec3 diffuse;
    vec3 emission;
};
On the GPU, you can’t create an array of array with undefined size. Which means that we can’t put the 3D points directly in the Mesh object. So instead, I put all vertices and triangle indexes together in another buffer.
offset represents the index of the first mesh’s triangle in the buffer Triangles ahd triangle_count gives the number of triangles.
The buffer Triangles store 3 vertex index for each triangle and the Vertices buffer store all 3D points.
// GLSL
layout (std430, binding = 1) readonly buffer Vertices {
    vec3 vertices[];
};

layout (std430, binding = 2) readonly buffer Triangles {
    int triangles[];
};

layout (std430, binding = 3) readonly buffer Meshes {
    Mesh meshes[];
};
On the CPU, the Mesh data type directly contains the vertices and the indexes.
// JS
export class Mesh {
    constructor(name, vertices, indexes) {
        this.name = name;
        this.vertices = vertices;
        this.indexes = indexes;
        this.triangle_count = indexes.length / 3;
        this.vertice_count = vertices.length / 3;
        this.offset = undefined;
        this.diffuse_color = glm.vec3(0.4);
        this.emission = glm.vec3(0.0);
    }
}
As I said earlier, we need to send data to the GPU before being able to use our renderer. Here I have 3 buffers in my shader so I need to fill those 3 buffers from the CPU. Let’s start with the Triangles buffer, which is the easiest as it contains only integers.
// JS
// Fill the triangles buffer.
const triangles_buffer_data = new Array();

// All indicies of all meshes will end up together.
// We need to offset them so that indexes point to the correct vertices.
let indexes_offset = 0;

this.meshes.forEach(mesh => {
    triangles_buffer = triangles_buffer.concat(mesh.indexes.map(i => i + indexes_offset));
    indexes_offset += mesh.vertice_count;
});

// Send the triangles buffer to the gpu.
const triangles_buffer = new Int32Array(triangles_buffer_data);
const triangles_buffer_id = context.createBuffer();
context.bindBuffer(context.SHADER_STORAGE_BUFFER, triangles_buffer_id);
context.bufferData(context.SHADER_STORAGE_BUFFER, triangles_buffer.length * 4, context.STATIC_DRAW);
context.bufferSubData(context.SHADER_STORAGE_BUFFER, 0, triangles_buffer);
We can then send the vertices:
// JS
// Create a buffer containing all vertices.
const vertices_buffer = new Float32Array((total_vertice_count / 3) * 4);

let triangles_buffer = new Array();
let accumulating_triangle_count = 0;
let gpu_i = 0;

this.meshes.forEach(mesh => {
    let vertices = mesh.vertices;

    for (var i = 0; i < vertices.length; i += 3)
    {
        vertices_buffer[gpu_i++] = vertices[i];
        vertices_buffer[gpu_i++] = vertices[i + 1];
        vertices_buffer[gpu_i++] = vertices[i + 2];
        // We must pad to fit in vec4 -> https://stackoverflow.com/questions/29531237/memory-allocation-with-std430-qualifier.
        vertices_buffer[gpu_i++] = 0.0;
    }

    mesh.offset = accumulating_triangle_count;
    accumulating_triangle_count += mesh.triangle_count * 3;
});

console.assert(gpu_i == vertices_buffer.length, "GPU buffer does not match vertices count.", gpu_i, vertices_buffer.length);
console.assert(gpu_i == ((total_vertice_count / 3) * 4));

// Send the vertices buffer to the gpu.
const vertices_buffer_id = context.createBuffer();
context.bindBuffer(context.SHADER_STORAGE_BUFFER, vertices_buffer_id);
context.bufferData(context.SHADER_STORAGE_BUFFER, vertices_buffer.length * 4, context.STATIC_DRAW);
context.bufferSubData(context.SHADER_STORAGE_BUFFER, 0, vertices_buffer);
Now that we packed all indexes and vertices together, we can send meshes.
// JS
// Create a buffer containing all meshes.
const meshes_buffer = create_meshes_buffer(meshes);

const meshes_buffer_id = context.createBuffer();
context.bindBuffer(context.SHADER_STORAGE_BUFFER, meshes_buffer_id);
context.bufferData(context.SHADER_STORAGE_BUFFER, meshes_buffer, context.STATIC_DRAW);
context.bindBufferBase(context.SHADER_STORAGE_BUFFER, 0, meshes_buffer_id);
// JS
export function create_meshes_buffer(meshes)
{
    const buffer = new ArrayBuffer(meshes.length * Mesh.get_padding());

    // Create 2 different views to fill the buffer.
    const int32Data = new Int32Array(buffer);
    const float32Data = new Float32Array(buffer);

    // On the GPU we have:
    // int offset            4 bytes
    // int triangle_count    4 bytes
    //  8 bytes padding
    // vec3 diffuse_color    12 bytes
    //  4 bytes padding
    // vec3 emission         12 bytes
    //  4 bytes padding
    //
    // total: 48  Rounded up to 16 byte padding
    const mesh_padding = 48;

    const four_bytes_padding = mesh_padding / 4;

    for (let index = 0; index < meshes.length; index++) {
        const element = meshes[index];

        int32Data[four_bytes_padding * index] = element.offset;
        int32Data[four_bytes_padding * index + 1] = element.triangle_count;
        // padding
        float32Data[four_bytes_padding * index + 4] = element.diffuse_color.x;
        float32Data[four_bytes_padding * index + 5] = element.diffuse_color.y;
        float32Data[four_bytes_padding * index + 6] = element.diffuse_color.z;
        // padding
        float32Data[four_bytes_padding * index + 8] = element.emission.x;
        float32Data[four_bytes_padding * index + 9] = element.emission.y;
        float32Data[four_bytes_padding * index + 10] = element.emission.z;
    }

    return buffer;
}
The buffers are now available on the GPU, but we can’t use them as-is in the shader. They need to be bound before the shader runs.
bindBuffer(context, compute_program, buffer_id, layout_name)
{
    let index = context.getProgramResourceIndex(compute_program, context.SHADER_STORAGE_BLOCK, layout_name);
    let bind = context.getProgramResource(compute_program, context.SHADER_STORAGE_BLOCK, index, [context.BUFFER_BINDING,])[0];

    context.bindBufferBase(context.SHADER_STORAGE_BUFFER, bind, buffer_id);
}

...

//=> Bind the buffers to the rendering shader.
bindBuffer(context, renderProgram, vertices_buffer_id, "Vertices");
bindBuffer(context, renderProgram, triangles_buffer_id, "Triangles");
bindBuffer(context, renderProgram, meshes_buffer_id, "Meshes");
If you want to learn more about GPU buffers, you can read about the Shader Storage Buffer Object.
Progressive and interactive rendering
To keep a realtime frame rate and interactive controls, I used progressive rendering. Many frames are computed over time with low quality settings (samples per pixel = 1) and are accumulated together.
Like this, the render is instant and if you want a clean sharp render, you just have to wait.
The code for this is straightforward, you just need 2 textures. One for rendering a frame and one for accumulating and displaying the final result.
Here is a simple demo of accumulation over time using compute shaders that helped me to implement progressive rendering: demo / code.
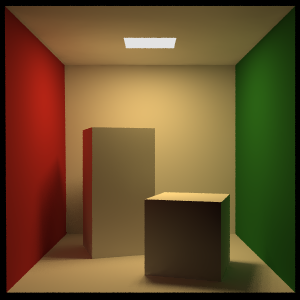
Render !
If you are interested into rendering, casting some rays and make them bounce, here are some links that will help you getting started:
- Getting started with webgl: WebGL fundamentals
- Getting started with compute shaders (web): WebGL Compute shader collection
- Implementation and theory of raytracing: Ray Tracing in One Weekend Book Series, Physically Based Rendering book.
If you have any questions or feedback, feel free to contact me or post a comment. I’m still pretty new to path tracing, any help will be appreciated.