Simple steps to optimize a Unity project
I have spent hours using the Unity profiler to understand how to make things go faster. By doing so, I have learned a lot about Unity, how does it work and how to prevent a bad framerate or a FPS drop. In this post, I introduce 4 simple tips that you can implement to improve your framerate and learn more about Unity.
TL; DR:
- Use
sharedMeshinstead ofmeshandsharedMaterialinstead ofmaterial. - Disable mesh and texture CPU reading and free procedural mesh CPU memory with
mesh.UploadMeshData(true) - Before calling
Instantiate(something, container), hide the container withcontainer.gameObject.SetActive(false) - Cache
Camera.mainvalue
Don’t duplicate meshes and materials
When you call the mesh property on a MeshFilter component, you should know that asset duplication may occur.
To access the mesh data, Unity provides 2 properties: mesh and sharedMesh.
mesh will give you a unique mesh object. If you have a mesh that is used more than once and you call .mesh instead of .sharedMesh, Unity will duplicate the mesh to return a unique reference. This will impact both memory usage and rendering cost.
Unless you specifically want a unique reference, and potentially duplicate a mesh, you should use sharedMesh instead.
The same logic applies to material and sharedMaterial on the MeshRenderer component.
Use less mesh and texture memory
You can choose to enable or not Read/Write when importing a texture or a mesh. When enabled, the asset will use twice as much memory!
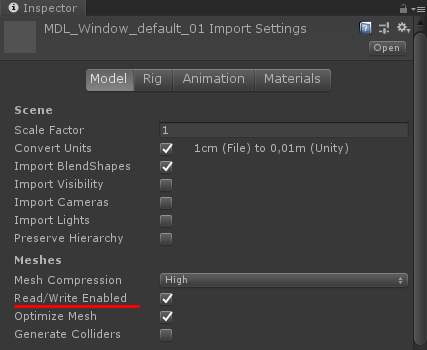
At runtime, assets are stored on the GPU memory so that we can display them. But to edit them with C#, they also need to be on a memory space where the CPU can read and write.
Unless you plan to edit the assets content with C#, you should disable this option to use the less amount of runtime memory possible.
This tip is also important for procedural assets generated at runtime. By default, when you generate a texture or a mesh, its memory stays duplicated. But once your asset is generated, you can free half of the memory (and lose the ability to edit it with C#):
//=> Generating a mesh at runtime.
var mesh = new Mesh();
// ...
// Free half of the memory, now the asset is only on the GPU memory.
mesh.UploadMeshData(makeNoLongerReadable: true);

//=> Generating a texture at runtime.
var texture = new Texture2D(/* ... */);
// ...
// Free half of the memory.
texture.Apply(makeNoLongerReadable: true);
You can use the following code snippet to find which meshes have duplicated memory and optimize memory usage:
/// <summary>
/// For testing purpose only.
/// Reduce memory usage of all meshes by storing them only on the GPU,
/// and lose the ability to edit them with C#.
/// </summary>
[MenuItem("Tools/Disable isReadable on all meshes")]
public static void SendMeshesToGPU()
{
    int removed = 0;
    int alreadyOnGPU = 0;

    foreach (var filter in FindObjectsOfType<MeshFilter>())
    {
        if (filter.sharedMesh)
        {
            if (filter.sharedMesh.isReadable)
            {
                filter.sharedMesh.UploadMeshData(true);
                ++removed;
            }
            else
            {
                ++alreadyOnGPU;
            }
        }
    }

    // Bad news.
    if (removed > 0)
        Debug.LogWarning(
            "Removed " + removed + " meshes from the CPU memory.");

    // Good news.
    Debug.Log(
        alreadyOnGPU + " meshes were already on the GPU and not on the CPU.");
}
Disable before instantiate
When instantiating stuff into an object, Unity will invalidate the object to make sure everything is set up properly on the next frame.
// Container will be invalidated.
Instantiate(prototype, container);
This can slowdown your game very badly in some cases. For example, let’s say you are filling a UI Scroll with some elements. Each element added will invalidate the Scroll and in the end, you can notice a huge framrate spike.
To keep your framerate stable and make sure Unity doesn’t run too much tasks for nothing, you can hide the container while filling it:
// Deactivate the container.
target.gameObject.SetActive(false);

Instantiate(source, target);

// Activate the container.
target.gameObject.SetActive(true);
You won’t notice a visual difference if you deactivate, fill and activate during the same frame. But you will notice a performance difference depending and how many object you instantiate and how your UI is built.
This tip can also be used for non-UI stuff. Test it and profile it to see if it makes a difference.
Cache Camera.main
Since Unity 2020, this property has been optimized and should not be a problem anymore.
Under the hood, FindGameObjectsWithTag is used to find the main camera. If you use Camera.main at many places in your code, especially in Update or LateUpdate, your framerate is probably affected.
The simplest solution is to make sure you don’t call Camera.main more than once per frame. To do so, create a simple component that store Camera.main and call CameraManager.Main instead of Camera.main everywhere in your code.
using UnityEngine;

/// <summary>
/// Cache Camera.main Unity property to make sure we don't call it more than once per frame
/// and affect the framerate.
/// </summary>
public class CameraManager : MonoBehaviour
{
    public static Camera Main { get; private set; }

    void Update()
    {
        Main = Camera.main;
    }
}
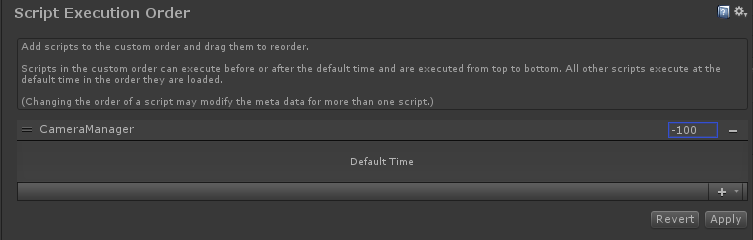
Make sure that this script is running before other scripts by changing the execution order in Edit > Project Settings > Script Execution Order. In this way, the CameraManager.Main property will never change in the middle of a frame for other scripts.
To make it even better, don’t set Main property in Update(), but only when you know that the main camera is changing.
Use the profiler
I hope that these tips helped you in a way. But keep in mind that these tips I showed here are very basic and may not have the effect you whished for. To take the best out of Unity and your game, you should use the Profiler.
Tell me how you managed to improve your framerate !